Friday, April 15, 2016

Because a boy needs a coin pouch too... A Tutorial.

We usually give our children Red Envelope money during Chinese New Year.  It's a Chinese tradition where the older relatives gives children some money that were put in red envelopes and bless them for the new year.  They also sometimes gets Christmas and Birthday money.  My 7 year old son usually just stuff his money in his desk drawer, and put it in his pocket when he goes shopping.  I tried offer to buy him wallets, but then there's no place for his coins.  The coin pouches that we saw were rejected also because it's too girly or too baby-ish.

So, a mom who sews naturally offered to make him a pouch.  After the mustache print was approved, I got to work.  And here's a simple tutorial for you if you want to make one.


Cutting: 
Two      6” x 3 5/8”        exterior fabric
Two      6” x 3 5/8”        lining fabric
Two      2” x 1”               zipper tabs
Two      5 1/4” x 3 1/2”  fusible batting
One       4” or 5"             zipper
One       1 1/2”                ribbon (optional)


Center the batting on the back of exterior fabric and quilt.  I quilted simple straight lines.


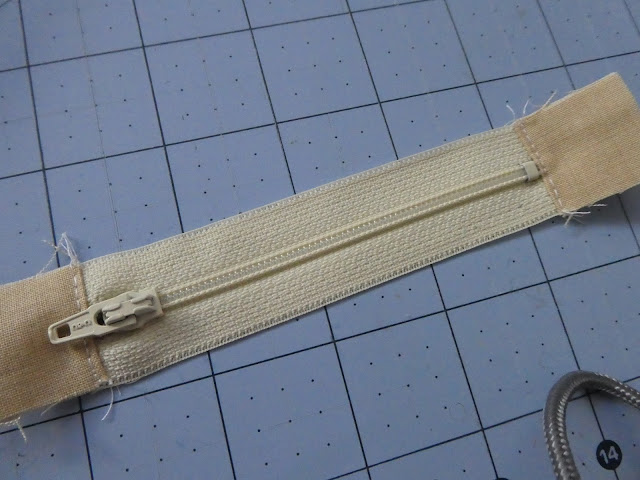
Fold the zipper tabs in half, then open it up and line up the fold line on the ends of the zipper.  Sew on the fold line, then fold the tabs and top stitch along the fold to reinforce the stitch.  You can clip the zipper end (not the zipper tab we just sewn) if it's too long. Make sure you leave at least 1/4" seam!


Next, put your exterior on the bottom with right side up, put your zipper along the top side of exterior with right side down, last put your lining fabric on top with right side down.  All line up at the top edge.  (see picture above).  Pin and sew 1/4" seam using your zipper foot for your sewing machine.  Fold back the exterior and lining fabric. Repeat the other side. Picture below is what it looks like. Add your ribbon to the side of the exterior fabric if you like at this point.


Next step, open your zipper.  Then put the linings right sides together and the exteriors right side together and pin to keep them in place.  You will sew around the whole pouch with 1/4" seam, leave 3" opening in the middle of the lining for turning. Not sure if you can see it clearly, but it's that blue line I drew around the edges on the picture above.


Turn your pouch right side out through the lining opening and the zipper opening. Then hand stitch or machine top stitch the lining opening close!  YOU DID IT!!


Give your final product a pressing and it's ready for the recipient!

Thursday, April 14, 2016

Patchwork Party #9 & 10: Pets and Fabric stash

#9 Pets and Quilts
Cotton and Charcoal on Rag Quilt


Guinea Pigs and Quilt

Meet Cotton & Charcoal. Our first family pet guinea pigs. We adopted them from a shelter this January.  My older daughter picked the white gentle one and named her Cotton, my son picked the black one and named her Charcoal, Charcoal is pretty jumpy and shy.  My husband wanted to name her Ninja, but it was vetoed.

I made this baby lovey rag quilt 2 years ago, in the beginning of my quilting journey.  I made it by following Angela's tutorial on Crafty. http://www.craftsy.com/blog/2014/02/making-a-rag-quilt-tutorial/   It was nice little project, I only wish I had made it bigger.  So now, it hangs on my shelf in my sewing room.  Maybe I will give it to my youngest daughter for her baby dolls.


#10  Stacks of Fabric
Tula Pink and Tasha Noel, Fabric Stash

It was hard to choose which stacks of fabric to photograph and post.  In the end, I went the easy way.  I just took a picture of my stash of Tula Pink and Tasha Noel that was already in a basket.  I got my Tula Pink when a local quilt shop went out of business, and I just love the cute farmer girls picture in Tasha Noel's "Vintage Market."  They are just waiting for the perfect project.  For now, they serve as eye candy and inspiration! That's important too, right?!

Friday, April 8, 2016

Patchwork Part #7 & 8 : Thread and Paper-Piecing

#7 Pretty Thread


Pretty Threads
Don't you love these variegated threads? The colors are so delicious!!  I bought a box of this embroidery floss some time ago, and I still need to find a perfect project for them!! But for now, they serve their purpose as eye candy and color inspirations!


#8 Paper-Pieced Project


"Succulent", Arizona Family Trip

I grabbed this "Succulent" pattern by Amanda from Material Girl Quilts when she offered it as a free pattern.  Yay for me!!  It was the perfect memory quilt for our family trip to Arizona in 2013. Reminds me of all the cacti and the big Saguaro we saw.  They were AMAZING!!  It also reminded me of how big USA is!  It's so big that we have 3 time zones, and very different weather patterns from snowy to deserts!  Not to mention how diverse our cultures are.  Truly, traveling is the best teaching experiences for us.  If you can keep an open mind and adventurous attitude, it really humbles me.  We all live in America, but we experience America very differently!

Patchwork Party #5 & 6: Low Volume & Seasonal

#5 Low Volume


Low Volume
I put this small bundle of low volume fat quarters together for my etsy shop.  I love the soft pink and gray!  Can you tell that's my favorite combo right now?  Just take a look at my splendid sampler blocks!  haha!


#6 Seasonal Project


Christmas Mug Rugs 2015
These are the mug rugs I made for Christmas gift this past year 2015.  I got them as a kit at my local quilt shop Circa 15 Fabric Studio during our local shop hop!  It was great fun!!  They ware perfect little something to say thank you to my children's fabulous teachers and my awesome Bible Study Fellowship small group leader!   I end up making more than I had planned because my mother-in-law asked me to make them for her friends too! I guess it's handy to have a quilter/maker in the house. smile.

Wednesday, April 6, 2016

Patchwork Party #3 & 4: Blocks in Progress & Binding

#3 Blocks in Progress
IMG_4466
"Focal Point" - The Splendid Sampler
Here is my Splendid Sampler Block #5 “Focal Point.”  Splendid Sampler is a year long 100 blocks quilt-along hosted by Pat Sloan and Jane Davidson.  Check it out at http://www.thesplendidsampler.com/
I’m way behind, but here is a collage of what I have so far:
The Splendid Sampler


#4 Binding Shot
IMG_4544
Machine Binding
I machine bind almost everything these days.  I don’t mind seeing the stitch lines on my binding so that’s my method of choice.  Here I’m putting the binding on a pot holder.

Patchwork Party!! #1 & #2: A Pillow and a Favorite

Corey Yoder, @corianderquilts.com, is hosting a patchwork photo of the day challenge for the month of April on instagram. There’s a photo prompt each day.  It’s fun to look back at my pictures or look for the objects in my sewing room.  Here are some of my photos so far…
1. Patchwork Pillow
VW Beetle Pillow PATTERN
VW Beetle Pillow
VW Beetle Pillow
For my pillow photo, it’s got to be my VW beetle Pillow!!  It was my first ever design.  I draw the car from looking at online pictures, trace and cut out different parts of the car on paper-backed fusible, iron on fabrics, more cutting and than fuse on the background.  Top stitch around the shapes, straight-line quilting and assemble the pillow!  TA-DA!! For the pattern or a custom-made pillow, visit my etsy shop!
2. Fave Completed Quilt
IMG_4538
Star Wars Quilt - For E. Christmas 2012
My favorite quilt has to be my first ever quilt that I made from start to finish!  Yeah, I did a baby panel quilt before, but that was just assembly.  I saw the Star War pattern on craftsy and dived right in without knowing that paper-piecing was an “advance” technique. That’s the blessing of ignorance!!  Ha ha. (I guess you can say the same about our house remodel 3 years ago, but it turned out great! ) There were some re-dos because I didn’t use big enough of fabric scrap or the angle wasn’t right after flipping, but it wasn’t so bad after I learned from it. Mistakes are your best teacher!!  I did as many characters as my patience allowed, then I added some strip blocks and star war print blocks.  Quilting on my domestic was a bit challenging, but I managed.  I tried different free-motion patterns on the print and strip blocks and just outlined the characters.  It’s definitely not perfect and I would do somethings differently now, but I am very proud!!